On February 1, 2024, Google and Yahoo will implement new email sender requirements to improve deliverability and protect user inboxes.
If you send email via a 3rd party platform like MailChimp, Constant Contact, Keap, etc. - you may see a dramatic decline in your email deliverability unless you take action.
The 2024 Email Scene: What's Changing?
As 2024 unfolds, Google and Yahoo are setting new standards for email delivery. These aren't just suggestions; they're requirements to ensure your emails reach their destination and aren't marked as spam. Starting in February, these changes will primarily affect bulk email senders, but it's wise for everyone to be prepared.
Before we dive into the changes, let's understand some crucial terms:
- SPF (Sender Policy Framework): Think of SPF as a guest list for your emails. It's a list stored online that tells email providers which mail servers are allowed to send emails from your domain. If an email comes from a server not on the list, it's treated with suspicion.
- DKIM (Domain Keys Identified Mail): DKIM is like a fingerprint for your emails. It uses a digital signature to verify that the email hasn't been tampered with on its journey and truly comes from your domain. It's a way of adding a layer of trust to your messages.
- DMARC (Domain-based Message Authentication, Reporting & Conformance): DMARC is like a set of instructions you leave for email providers. It uses SPF and DKIM to determine the authenticity of an email and then tells the provider what to do if the email doesn't pass the test (like rejecting it or putting it in spam).
Here's what you need to know:
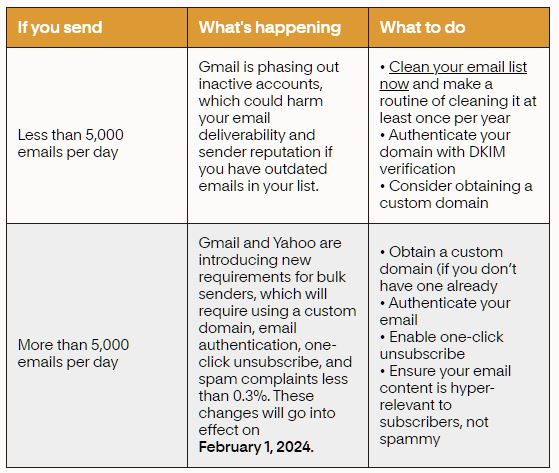
Authentication is Key: Both Google and Yahoo will require you to authenticate your emails using DKIM. Plus, you'll need a basic DMARC record. If you're already using these, great! If not, it's time to start.
Own Your Domain: Sending emails from @gmail.com or similar is a no-go. You need to use an email address from a domain you own. This move is vital for meeting the new authentication standards.
Keep Complaints Low: Google wants your spam complaint rate under 0.3%. High rates may lead to your emails being blocked.
Gmail is Removing Inactive Accounts:
Since December 1st, Gmail is removing inactive accounts dormant for 2+ years. Regularly cleaning and updating your subscriber lists is becoming increasingly crucial to ensure you maintain a healthy email list and sender reputation.
Frequently Asked Questions
Who's Affected? All email senders, especially those sending bulk emails.
What if I Don't Comply? Google and Yahoo might block your emails, damaging your reputation and deliverability.
Does Sending Volume Matter? While there's talk of a 5K daily sending limit, it's not a safe zone. All sizes need to be authenticated.
What About Low-Volume Senders and DKIM? Fear not! DKIM is beneficial regardless of your sending volume, improving your open rates and reputation.
What if I'm a High-Volume Sender? It's crucial to transition off generic authentication and onto your domain. This might seem daunting, but it's essential for maintaining deliverability.
Your Easy Guide to Email Authentication
Email authentication is a bit like a passport for your emails, proving they're legitimate and not spam or phishing attempts. Before we get into the specifics, ensure your sending domain is valid (at least 30 days old) and points to a live website, not a blank page. It should also have an MX record, which is like a signpost directing emails to the right server.
Below is a straightforward video walkthrough on how to implement SPF, DKIM, and DMARC into your domain's DNS records. This specific video goes through the step-by-step instructions via the Google Workspace Suite. If you don't use Gmail, the authentication steps will be similar, but may look different based on your email provider.
Setting Up The Trio of Trust: SPF, DKIM, and DMARC
SPF (Sender Policy Framework): Think of SPF as a VIP list for your domain. It's a TXT record that specifies which servers are allowed to send emails on your behalf. Your email service provider might already configure SPF for you. If you want to add your provider to an existing SPF record, you would typically add something like "include:providerdomain.com" to it. Remember, you can only have one SPF record per domain, so if you already have one, you'll need to update it rather than creating a new one.
DKIM (Domain Keys Identified Mail): DKIM is like a secret seal your emails carry to prove they're from you. By February 2024, you'll need to set this up. Your email service provider might default to using its DKIM signature, but setting up your own is straightforward and adds an extra layer of credibility. Here's how:
1. Log into your email service provider's platform as the admin.
2. Navigate to Settings and then the Advanced tab.
3. Choose the option to manage your email authentication.
4. Your provider will generate two text records. Add these to your DNS provider (where your domain is registered or hosted).
Your DNS host will need the following.
Type: Choose TXT.
Name or Host: Copy the DNS Host name (TXT record name)—This text is the name for the DKIM TXT record you'll add to your domain provider's DNS records. Enter this name in the Host field.
Value or Record: Copy the TXT record value—This text is the DKIM key. You'll add this to your DKIM TXT record. Enter the key in the TXT Value field.
TTL (Time Till Live): Use the recommended or default setting (often 300 seconds).
After setting up the records, return to your email service provider's platform and verify the setup. If you're sending from multiple domains, you'll need to do this for each one. It may take up to 48 hours for the DKIM authentication to start working.
DMARC (Domain-based Message Authentication, Reporting & Conformance): DMARC is your domain's policy on how to handle emails that fail SPF and DKIM checks. It's like instructions left for email providers. Starting with a 'none' policy is safe, as it allows you to gather reports without affecting your deliverability. Over time, you might move to 'quarantine' or 'reject' to tighten security.
To set up DMARC:
- Create a TXT record at your DNS provider with a Host or Name of _dmarc.
- Enter a value like: v=DMARC1; p=none; pct=100; rua=mailto:[email protected] (replace with your email).
- Consider using a DMARC Monitoring solution for easier report reading and actionable insights.
Additional Authentication Methods
BIMI (Brand Indicators for Message Identification): A newer standard that works with DMARC to display your logo in emails, helping recipients instantly recognize your brand.
BIMI uses Verified Mark Certificates (VMC) to verify brand logo ownership. Today, the BIMI standard requires your logo to be a registered trademark to get a VMC. However, the standard is being expanded to include logos that aren’t trademarked.
SenderID: This was Microsoft's attempt to replace SPF, but it's now deprecated. If you have any Sender-ID records, it's time to remove them.
Authentication can be complex, but it's essential for a trustworthy and secure email ecosystem. By setting up SPF, DKIM, and DMARC, you're not just complying with email providers' rules. You're ensuring your emails reach their destination, protecting your domain, and building a reputation as a reliable sender. Take the time to set up these protections and keep your email communications smooth and secure.
For further information, you may wish to visit your email service provider’s website with instructions for effectively setting up SPF, DKIM, and DMARC with their specifications.
Need Help with these steps?
If all this is too overwhelming or confusing, we can help authenticate your email for you by setting up your SPF, DKIM, and DMARC.
Interested in our assistance? Here's what to do:
- Click the button to be redirected to a payment form and complete our $150 service fee.
- Answer a brief questionnaire where you'll need to provide login credentials to your email provider(s), any tools that send emails on your behalf, and where your domain is hosted (Cloudflare, GoDaddy, Bluehost, etc).
- We will email you a confirmation that we have received everything needed to start the email authentication process.
- Wait 2-3 business days for us to authenticate your email and we'll let you know when it's done!